Make it work 2: GT 97 Racing - "playing" the game
After creating the NO-CD version of the game it was time to play some is not it? It started out really hard and after perfecting the game while making it run without any lag... I have found that it is unbeatable on the first level even with a perfect drive!
It seems the internet is also complaining on this: People write on various places that there are versions which are unbeatable and versiouns which are beatable. Instead of finding a right versioun I thought it is best to go and 'play' a bit differently - 'play' with some debuggers and reverse engineering tools.
After all this became a much longer and harder journey than removing the no-cd code. The results are presented in this post, but if you are only interested in downloading the final binaries, scroll down to the posts end!
Also if you just want to see how I removed the CD-checks, look for the earlier post on this very same blog.
Making the game run smooth
First I present how to make the game run smooth. It actually plays really well even on my machine, but I have found out that it runs completely without any frame drops if I use the following dosbox setup:
    windowresolution=640x480
    output=surface
    ...
    machine=svga_s3
    scaler=normal2x
    ...
    core=dynamic
    cputype=pentium_slow
    cycles=fixed 40000
    cycleup=10
    cycledown=20
The key point is that the cycles must be fixed for best performance for some reasons. The game itself is using 640x480 for the menu graphics and you can choose between 320x200 (when you choose VGA) or 640x480 (SVGA) graphics. Because of this I choose the dosbox window to have the 640x480 resolution and apply a 2x scaler which makes the 320x200 graphics I choose to a 640x400.
Choosing the 'surface' output mode tends to be the fastest in my opinion but it does not enable automatic scaling of the screen so we had to choose manual scaling. Also even with the 2x scaler the window will be 640x480 which is smaller than my usual desktop resolution (otherwise I could use temple-os hihi) so the game would not fill the screen. To automatically play with the game filling the screen in 'surface' mode, I choose to create a small shell script that changes the x resolution before playing (yes... into 640x480). This way the game is smooth like a silk and runs like a tiger :-)
    #!/bin/sh
    xrandr "-s" "640x480"
    PULSE_LATENCY_MSEC=60; dosbox -conf ./dosb.conf
    xrandr "-s" "1024x768"
After ensuring that the game runs silk-smooth, excercising the gameplay and still feeling the game is unbeatable on the very first level, I went on and searched the interweb for more information.
What others think about the issue
First of all... I see there is at least one person who can beat the first canadian map in the very same 'Amateur' skill level I tried. This is something that ensures the game should be played normally somehow - yet the video on the link is from a pro player so I excercised until I play at least like him and ensure it is not a question of skill.
Below the youtube video, people are complaining that they cannot beat the game and some are saying there are versions of the game floating around that have some issue and do not let us win the races. They call these bad dumps.
After playing the game and comparing my gameplay to the video I realized and ensured: I literally get less time each checkpoint than the dude in the youtube video. I always get the same amount regardless what I do, but he always gets more.
On the canadian map this is what I measure against his:
    me: +32, +26, +20, +13, +10, +5 seconds
    he: +36, +33, +30, +25, +26, +26 seconds
First it seemed that this might be related to the CD and the missing audio tracks - speculating they maybe contain checkpoint timing extras - but this is not at all the case as it turned out.
First day, first ideas
On the very first day I went on and opened the dosbox debugger right away with the intention to find the code that increments time at checkpoints.
With the dosbox debugger already set up (see last post), one can stop the game at any moment with ALT+PAUSE and get an interactive debugger with a window about where the program code is right at the moment. My intention was a bit childish: get as close to a checkpoint as possible, then pause :-).
Better setup
I have found out fast that in order for this to work, I cannot use the 'dynamic' core type in the config as it is unreliable when stepping the code.
core=dynamic
I have already found out also that it is best to turn off sound completly as it fills the debugger log with IRQ requests and stuff like that.
Finding the main loop
The reality is that there is of course no chance to stop right at the moment of a checkpoint update - and in the relevant code parts. Also the game does a lot of stuff so just stopping 'before and close enough' is too far to step through the code until the checkpoint comes. I realized this in the first minutes of course so I made up a different strategy: to stop the code with the intention to find a 'main loop' of the race.
In most modern engines (at least those that are still single threaded) now there is a main loop that updates everything for this frame and loop over the next, the one after the next and so on, until we stop or win.
It is simple logic like this:
    loop:

    forall obj: update(obj)
    forall obj: physics(obj)
    forall obj: render(obj)
    forall gui: update(gui)
    forall gui: render(gui)
    swapbuffers()

    while not end: goto loop
In modern well known engines like the Unity game engine for example this is implemented in an object oriented, component based fashion where everything that can be placed somewhere is a 'game object' and it has its own 'Update' and other engine-called methods where the engine just calls our "script" and let us do what we want to do in response to the call. In unity and modern engines one can put multiple srcipts and behaviours on an object which makes things more complicated. Not much though as this only means that the above update(obj) is not just directly one scripts 'Update' function, but it is first an operation that iterates all the scripts on it and calls their updates one-by-one after each other. Then there is a number that defines the order of the scripts and tells which comes after which. This is all visible if one thinks a bit below the roof of the engine while using it...
This is the loop we are searching for as it runs basically in every frame. Of course I did not even think that the loop would look like how I imagine the main loop of a modern, but single threaded engine, but I was sure there is some kind of loop and it will do the very same in some ways.
After stopping the game randomly, stepping around a bit in the functions I have found a spot where I can place a breakpoint and see it being hit in every frame. Before I got to this point I also realized there are some other methods that are called 18 (0x12) times per frame in this map and made note of this inner function exiting from which I got to a place that is called only once.
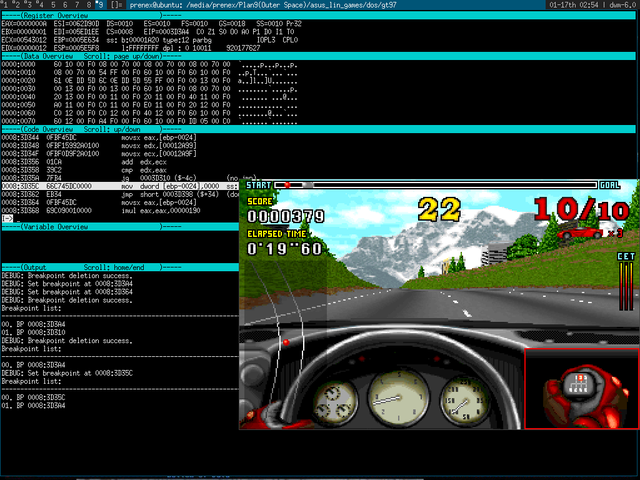
The above screenshot is taken from the "frame" loop or call. From a place that seems to be somewhere in the main function very closely to it.
A story about DOS extenders and debugging
When I was at this point and barely found something that gets called only once in the main loop - but not even the main loop itself - I have found the tools a bit limiting. I started to map the source code on paper by drawing down what parts are calling what others but I remembered: this is what the famous debugger, the IDA Pro personal edition is for!
The problem was that I remember loading the game into HIEW32 it thought that the hackers view is facing a 16 bit dos application while clearly it is a 32 bit one that uses some 'dos extender'. Extenders basically are small layers over DOS that change the processor into 'protected mode' just to use more than 1Mb or memory and some newer 32bit CPU features in DOS. The most famous dos extender is DOS/4GW which starts before many famous games like doom or duke nukem 3d. Most of the work done by extenders later became standardised by the 'DPMI' (Dos Protected Mode Interface) specification, but when that have happened most of the famous stuff already used DOS/4GW or something famous directly.
A DOS binary with an extender looks like this:
- 16 bit code that loads the extender and some of its I/O stuff
- 16 bit code that changes to protected mode and jumps to 3.
- 32 bit protected mode modern code (application)
So whenever a debugger opens the file it will guess it is 16 bit application by the first few (lot) of bytes. The main application logic is however 32bit and is coming later which will show up like a mess in the debugger and using maps that the IDA generates will confuse us more than help.
When developing, the developers first create a 'flat' executable in '.LE' format usually that only contains the third part with todays normally felt linear memory model and modern things that is later transformed into the final executable. As it turns out most debuggers can read this linear format so we only had to search how to remove the first two boilerplate parts in a way that gives back the LE source format instead of just the binary of the third part from a given offset.
As it turns out, there was a tool just for this cause. So DOS32A became open source and it is an extender that contains a tool that enables us to remove the administrative stuff of other famous dos extenders, getting back the LE format and repack with DOS32A instead.
This sounds extremely nice so far, I tried it, but this is not a famous DOS extender and the tools did not work at all this way:
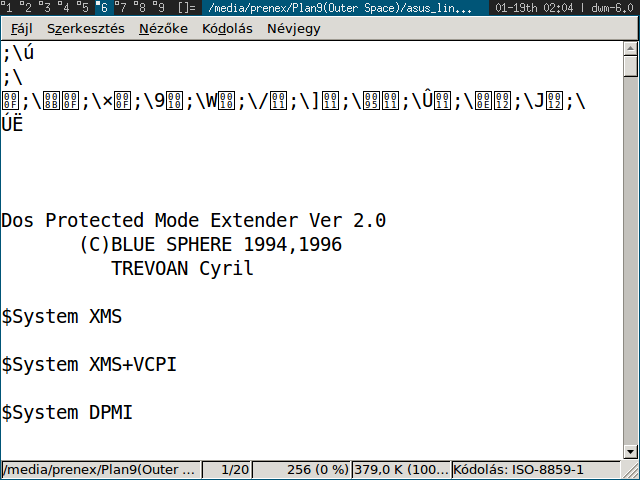
As it seems it is actually a very homebrew, rare kind that is made completely by the developer of the game (Blue Sphere made the game too).
No luck so far. I could choose to decypher the extender too or just stick to the already used tools so far. I choose the latter.
Interesting loops
So I kept drawing and decyphering with pen and paper to find this:
0008:3D310 loop begin
             runs 12x
0008:3D35A loop bottom
     !!! frame updates here !!!
0008:3D364 loop begin
              runs 10x
0008:3D3A2 loop bottom

0008:3D3AC loop begin
              runs 12x
0008:3D3F1 loop bottom

0008:3D3FB loop begin
              runs 12x
0008:3D445 loop bottom

if([12AA5]!=0) call 5231B

call 4FAA3 // sound?

call 3E2E5 // many-branch function

...
Oh... and when I say it runs 12x that means 18x because I counted in hex. For the very same reason 10x above means 16x in human decimal system.
I marked where I saw the picture changing on the screen (frame update) and found these are part of the main loop of the game. Also I have found out a lot of other things like [ebp-24] is usually allocated by the compiler as a "loop variable" and that most of the times the loops are usual 'while' type loops with the looping condition first being checked.
As there is no such construct in machine language as a while loop, but there are jumps that can jump backwards after a comparison, I could even see that their compiler were using a really simple strategy:
    jmp check
loopbegin:
    ...
check:  cmp [comparison]
    jnz loopbegin
Of course I am overly simplifying it, but you can get what I am telling.
Video, sound and some free space
For some reason I spend the remaining of the day with checking the first among the loops and the 4FAA3 call. The first loop was interesting as it seemed that everything updates on the screen after that is completed.
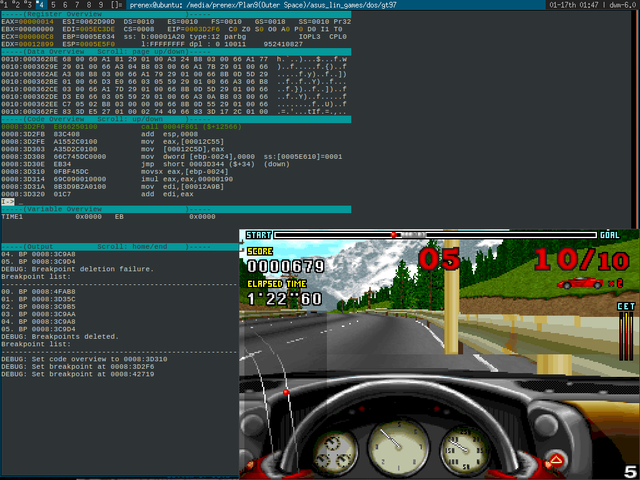
The first loop turned out to not do anything else than what a modern world engines 'swapbuffers' call would do. It just gets the stuff really on the screen according to the video mode in use (either VGA or SVGA). It might be multiple times for many reasons, but I finally settled that they might use something that tries to quees which screen parts are actually overwritten in this frame and which are not - think of the lower parts saving of work with their nearly constant cockpit ui.
Also there were either dirty and tricky awsome hackz that not only tries to update the screen while a vertical retrace is happening (while the electron beam travels from the bottom to the top without drawing) but it seems this game actually tried to 'guess' where the beam might be and update the areas BEFORE the beam in a way that shows the state for the next frame. Because the areas are there where the beam already drawn this time, the use never see the tearing what I screenshot above. It is actually against tearing to render this weird way if you get it. I am not sure though if this is a bug or a feature in the engine, but after I have found out that the method is only about oldschool buffer swapping trickz and hackz I moved on.
Following my weirdness in simmetry I went on and tried something on the other end of my map about the main function: the last two calls I mapped out.
One of them were looking to be a really complex and long function that I started to call 'many-branch-function' or 'many-if-function' because it had a whole bunch of conditional cases and deep structure, while the other was ending in a pretty interesting data-copy that moves around 6kb data in RAM.
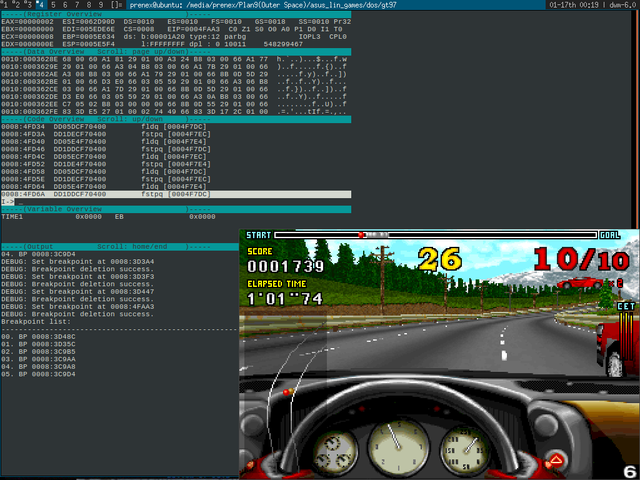
To be honest I really got interested in knowing why this method is made the way it is programmed. In most cases programmers just tell a source and a destination address, the amount of DWORD (32 bit) data to move and issue a rep movsd operation instead of this.
What you can see here is that there is one floating point 64 bit load and one floating point 64 bit store which pairs we get as much as it is enough for moving the 6kb area - all of this directly coded with operations and no loops or anything whatsoever!
Aside this way it is possible to move 64 bits with one instruction, this kind of implementation rely on the coprocessor working on the data passing and every normal processor of the time and even today could interweave the normal and the coprocessor operations parallel to each other when possible.
The memory is shared, but if the CPU is not reaching out for the bus, it might have lead to some speedup. For todays machines this is however not only not that great of an optimization, but actually running this on a virtual dosbox environment must be much more slower than what a rep movsd would feel like. Also it eats instruction caches and have other bad things even on a real hardware but it was hopefully a gain at the time of this game was made.
I quickly acknowledged however that I can exchange parts of this data move with much more compact stuff and gain a lot of space for custom program code if I would need it.
From the size of the moved data I suspect this is doing something sound related, but it is a wild guess only. Also exchanging the call with NOP operations instead results in no change in the gameplay and I had the sound completely turned off already.
Second day - some real progress
Sadly I went on and got a hacker biorythm from this stuff - staying up until 03:00 in the morning and more - but after wakup next day I had a good idea!
I remember that turning the 'sound' call on and off was easy-pie as I only had to exchange the opcodes and address of the call operation with 0x90 bytes which are encoding NOP (no-operation). So instead of the jump, the CPU just did not do anything for some cycles. I thought: why not just 'disable' parts of the program in hope that no crash will happen and in even bigger hope that I might find the meaning of the disabled parts by acknowledging what is missing from the game? :-)
Render function: 3E2E5
I have found out quickly that the 'many if function' I mentioned before is actually renders the screen for example. If I disable its call, the 3D view gets frozen, but the GUI and overview map still works: also the timer still ticks down, I get time for the checkpoints and game logic works too.
I must tell I was quite happy that I do not need to go through analysing the 'many-branch-function' because it looked a big complicated with all its special cases and branches. Now we understand that it does 3D calculations so there is a reason why it is so 'interesting'.
I also suspected the 5231B function that it might be the one that is called when we hit a checkpoint, but turning it off completely did not do any kind of visible change.
Car-physics loops
Instead of mapping out more of the main loop (there are more to it still unmapped by me in the end as you can see), I went and checked this loop:
...
jmp looptest
0008:3D364 loop begin
              runs 10x
looptest:  cmp,...
0008:3D3A2 loop bottom (jnz loopbegin)
nextpoint:
...
As I mentioned before, loops tend to be "preconditional" and first check if we need to do it once or not at all and how this is implemented with a jmp that basically misses the loop body and jumps to the checks in the bottom.
This compiler technique they used became really handy for us: to ignore the whole loop I had nothing elso to do than to change jmp looptest -> jmp next in the code which usually resulted in overwriting only one byte!
This is how the beginning looked in the debugger at runtime:
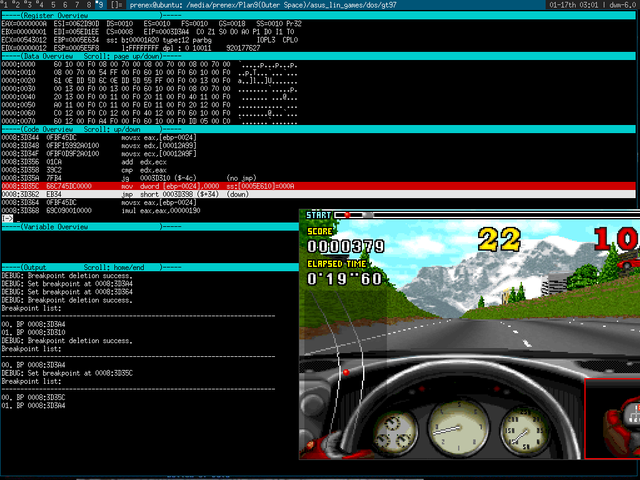
EB is the opcode for a short jump, with the following byte telling the CPU where to jump RELATIVELY from this location. This is a signed value so it can be a -127..+128 range from current code location. By adding a little we can practically always jump a bit further to miss the comparison and the whole loop for the first time - so it never runs :-).
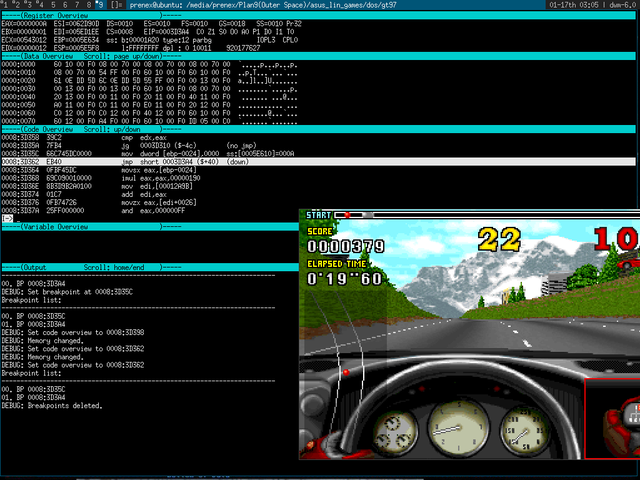
After hacking out this loop I have found that all cars go through each other and their physics are basically not working. The physics that make them run on the track and collide with the racing track is still working, but this was a really interesting finding.
Later I made a version of the cracked game where this is added as a hack :-)
The loop right after this one relates to this loop directly: when that is 'disabled' the very same effect will happen. I figure that one of the loops are calculating IF a collision happens between cars and the other is the one that actually calculates what the physical response should be on collision!
Time-move loop
Fast after the above I have found a very interesting loop that I called the 'time-move loop'. When disabling this, no cars are moving forward and the timer in the middle and also the timer that calculates the complete time being spent all stop working.
But hey! The checkpoint timer dont go downwards when this is disabled!
This is the part what I am talking about (see the address to compare above):
0008:3D3FB loop begin
              runs 12x
0008:3D445 loop bottom
We have clearly found a place that contains logic to decrement the main race timer so tracing that back to its operation we can find the memory address of the main timer count!!!
Interestingly the UI is still active and the cockpit animations were also active with the driver hand turning the wheel. Also when giving gas to the car it elevates a bit so forces are acting to it. The AI did the same and something funny happened: all cars blew up hahaha
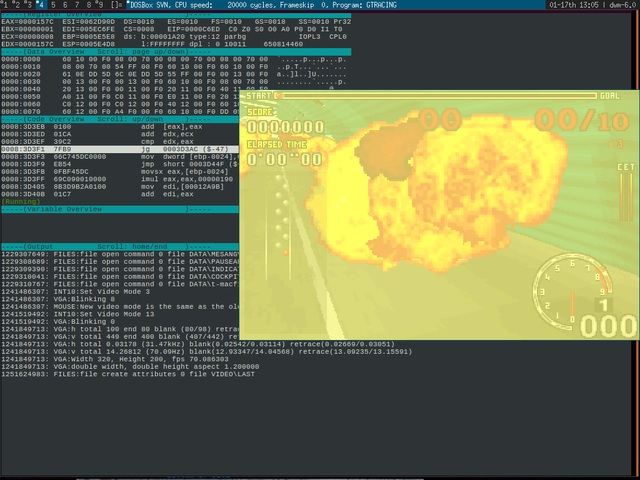
This have happened because the 'engine' blew up according to the simulation thinking it must be overused if we fully push the pedal and the car cannot go forward. Surely if we would face a wall tightly and push the gas pedal while the car is not moving at all - we would blew the engine in real life too is not it?
So we have not only found a loop that somewhere contains a call to a nice operation decrementing the main counter, but we have found a place we could use as a hack to destroy all the AI cars in the beginning.
Homework excercise
For those who follow up to this point and are interested, it can be a nice 'homework' excercise to create a code somewhere that turns this loop on and off according to some keypress combination. I would change the fldp and stp operations function for sound as exchanging that with a shorter version lets you write a lot of user-defined code in that area. If anyone ever makes this excercise it would be nice if they add a comment so I can know about it.
Hunt for the substract operation
Because we know at this point that disabling this loop also disables the main timer ticking down in the middle, we went on to search for what makes it go down. For this I pick up my earlier drawings and started to analyse the code with pen-and-paper once again. This time going into more details while writing the operations. It is a near complete disassembly written down by hand and it contains a lot of arrows, marks and my pet-naming of what I suspect going on at that part of the program.
The most relevant and detailed parts are on the back of a big receipt paper:
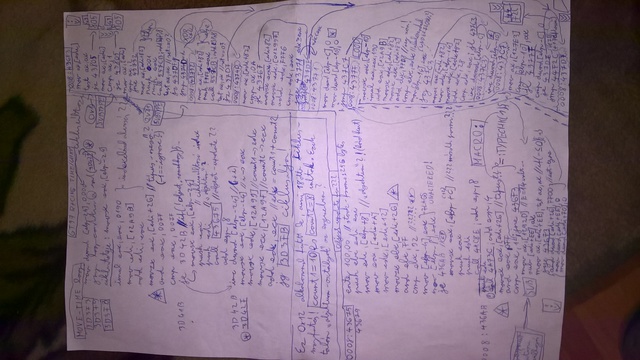
On the top-left corner is the detailed disassembly of the 'move-time-loop'. As you can see it basically iterates over ([12A99] + [12A9f]) number of things (maybe two 'kinds' of objects) and calculate some object / struct offset in the beginning. Here it is clearly visible that there is some vector-kind data structure of various 'objects' for which we calculate their base memory address (the beginning of the object) in the EDI register. Also after we look enough time: The loop counter is in [EBP-24]. This is what counts upwards until it reach ([12A99] + [12A9f]) times.
What is interesting is that the middle of the loop checks [EDI+26] and calls something only if this is not -1 when taken as a byte (cmp with FF).
This 'field' of the object I already defined as type at [EDI+26]. I kind of suspected that a type of kind of (-1) is basically an inactive game object and does not need to be updated. It is like when the little 'enable' tick is ticked off in modern engines like Unity :-).
Actually it was only at this point where I started to suspect that the game is actually really well structured and nearly follows what modern 3D engines are doing below the hood. Of course there is a reason why engines do stuff like they do today and it is because developers already programmed games in that very way for ages, but for some reason I expected the code to be just like a spaghetti of put-together stuff. I must tell that there was really nice order in the game code and after getting used to what you see and after mapping it out on paper it started to have a really clean structure with different things separated really nicely.
But going back on track: this loops calls 0008:43675 for all active objects and that function must be some 'object update function' after all isnt it? All the other parts of this page are details about this big and generic update function.
They did not put together a 'scripting' interpreter, but here they basically seperated different kinds of objects by analysing their 'type' and 'subtype' fields. Basically this is where they wrote what todays coders write in the 'Update' functions of a unity game object and they wrote the updater code just below the proper type and subtype comparisons. Of course the compiler could optimize this and the structure is much more broken in binary because of the tricks the compiler was made to make it run faster, but the generic structure still shines through.
As you can see this object-update function is quite big: I had to write with smaller and smaller letters and got out of space on paper even that way haha.
I had to use the other side of the paper:
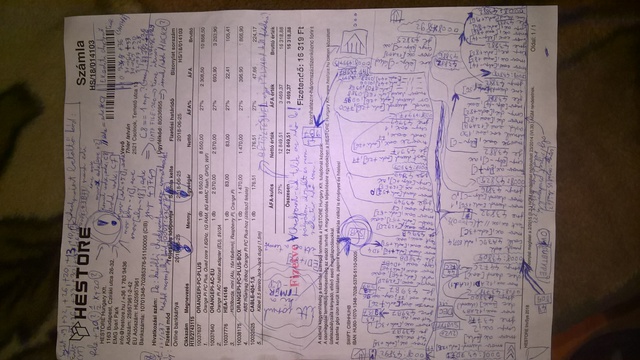
After all this work, I started to look like a mad scientist or 'pr0 H4Xx0R':
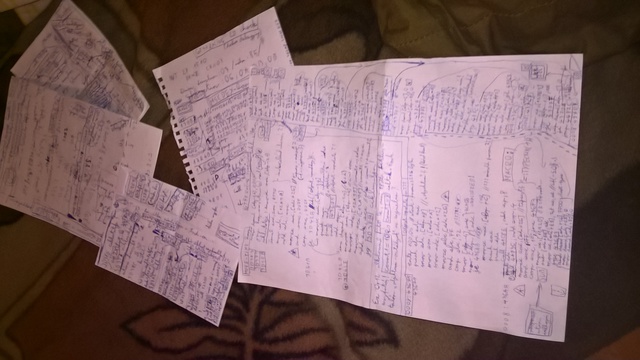
and it became 03:00 once again with flashlight of my mobile phone running out of battery power completely so it was time to sleep...
Third day - real breakthrough
Somehow I got up before 12:00 and had a terrible-good idea: let find sub operations in code I mapped out from the object-update function suspecting that they are the ones responsible for making the middle timer going down!
I just choose every sub operation on memory that I found relevant, then started to replace them with the good old NOP (0x90) operations.
Not-ticking timer
I have quickly found this part - before 12:00 that day:
    mov dword [edi+4E], eax
    mov eax, [edi+52]
    test eax, eax
    jz 4394B

    movzx eax, [1292D]
    sub [edi+52], eax  (HERE)
    mov eax,[edi+52]
    cmp eax,C8
    jge 43949
    mov dword [edi+52], 0
When I removed the substraction at the (HERE) marker I have found the main timer in the middle of the screen not ticking down anymore!!!
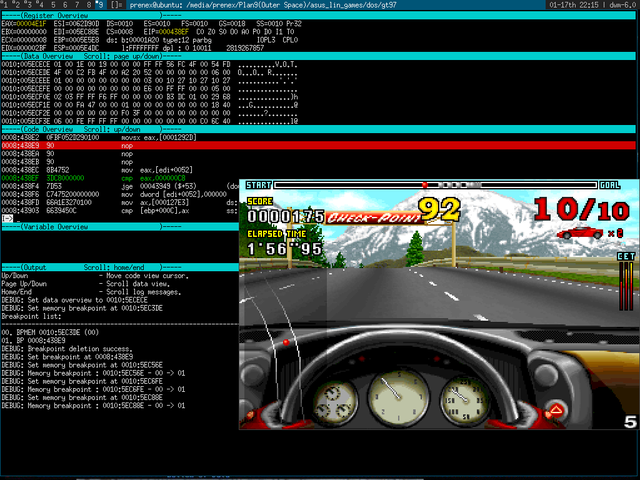
This is how it looks after making the above changes (nopping-out the sub):
Actually many people complained below the youtube video that they would have been much more happy with the game if it would not have the checkpoint timer at all so I could stop here and just play through the game happily.
I actually created an executable that has this hack in it for those who want to just completely ignore the timed part of the game and only want to race against the AI cars. However while trying to beat the game the first time I remember how the timer added a real sense of urgency to the game and how it made an emphasis on trying to drive as fast as I can! I did not wanted to lose that feeling with my hack on the executable so I went on to somehow try 'fixing' the time that the checkpoints gave me badly.
Analysis of the checkpoint timer code
There was one thing that bugged me a lot: When I placed a breakpoint into this region of the code, it would hit this many times in every frame. This is quite interesting as there is of course only one timer on the screen and only one timer the affect the gameplay at all.
Also the C8 comparison after the nullification of the variable seems to mean to me, that 'C8' (=200 in decimal) was some special delta-value under which everything is considered to be zero seconds. The top part of the code is checking the timer against zero, while the bottom part is the one that substracts from it in every frame. It seems the amount we need to substract is actually a calculated value in the [1292D] memory location. The latter is natural as more or less real time happens between frames depending on how fast the gamers machine is.
Also because this substraction is happening in every frame, of course the variable does not contain the timer value directly: it contains some integer value that basically represent a fixed point time in seconds from which we can get the seconds by a simple division.
Two ways to represent checkpoint bonus times
At this time I started to think why there is this code that substracts time values from various locations in every frame instead of just substracting from one place from where the main timer is reading its value?
Then I got an 'enlightement' feeling: Wow, maybe the track editor is not editing 'how much time each checkpoint gives to the player', but they might edit 'how much time the player has ABSOLUTELY to reach this checkpoint'?
This is a completely different kind of thinking and it makes some sense and is actually maybe much more simple for gameplay balancing in the end!
If this is how the checkpoints are represented, maybe they get loaded in the beginning of the race from file and the game substracts from all of these values from various checkpoints and the counter the user sees only shows the value for the currently active region. This would make sense in a way too.
If this is true however, I am a bit stuck as it is very well possible that the track data files contain these values directly and it is just loaded in with a file I/O operation in a binary way I cannot change its behaviour. If this would be true I would need to work a lot more in the direction of reverse engineering the track file format of the game...
What happens with the timer when a map gets loaded
After finding that I need to use the BPPM (BreakPoint to Protected Memory) command of the dosbox debugger instead of the normal memory breakpoint for some reason, I put a breakpoint to one of the locations where [EDI+52] was pointing to according to the debugger when I was near the substraction and with this breakpoint I tried to find out who else modifies the area.
I went an restarted the race which made the game load the track file once again and the breakpoint got activated as I suspected it will be.
This is how it looks when the same memory area is written to on map loading:
8:43BFF push edi
    inc eax
    movzx edx, [eax+2]

    imul edx,edx, C8 // edx *= 200
    add edx, C7      // edx += 199

    mov [edi+52], edx
    mov [ebp-1C], eax
    mov [ebp-18], edx
This is not simple I/O, but there is some processing! Wow I became happy!
I quickly realized what is happening here:
- The track data files contain checkpoint timing data in seconds!
- and one second = 0xC8 = 200 in the fixed point representation!
- The addition after the multiplication corresponds the 'delta' value we saw.
So they load some value from the track files into the EDX register and this
is the value in seconds so we need to multiply this by 200 which makes this
correspond to the scale of the fixpoint representation, while the addition
is only there because every value less than 200 is considered zero as we
have already found it out above.
This is really awsome to us, because this code runs for all the checkpoints if our logic was true in the last chapter and we can change either the multiplier, the constant for addition - or both - to fit our goals to get similar time bonuses at checkpoint like the guy in the youtube video I am using as a reference to fix the implementation!
Also because the value of 200 is one seconds and here the code originally multiplies with that, we can work with fractionals: multiplying with a value of 0x190 (=400) means every checkpoint will give two times bigger time and multiplying with 0x64 (=100) would mean we half every time the track file contains for every checkpoint.
Calculating new timing function
If we consider the original checkpoint timings as a series, we can think of this small code snippet as a function over every element of that series. So in case (x1): 32, 26, 20, 13, 10, 5, ... as I have measured it, we can tell:
(x2)[i]:= (x1)[i] * val-1 + val-2
as we choose it to fit our goals! With quick calculation on pen and paper I came up with choosing val-1 as 1/2 and val-2 as 20 seconds. That way we can get really close - nearly perfectly close - to what we see in the YT-vid!
After making the changes however I have found even though I have more time I still cannot beat the first level of the game! Wow! How is that?
Realizing why there are multiple counters
After playing a few races it became clear that my change is not working as
I hoped and expected. Instead of getting extra time at every checkpoint it
seems I only managed to get a one-time extra time at the beginning of the
race. This could be good-enough if I would be lazy, but it leads to really
bad gameplay if I would try to just give enough starting time instead of
the checkpoints giving their proper times, but how this have happened?
Then I got an other 'enlightement' moment: Oh, my last enlightement moment was actually completely bad and untrue! We get extra times at checkpoints and there is only one timer. But then why is there more timers for some weird reason? After breakpointing on them I have found out they are for the other cars! Wow! Even though it does not affect gameplay, they also have their own checkpoint counters!
Maybe the developer was thinking about adding multiplayer possibilities or game modes where AI cars could lose out to time but ditched this idea? Or maybe they already had a half-done homebrew 3D engine from an other game of theirs that had this possibility? I do not know, but this is fully calculated through the race and this was what gave me a bit of a circle around the truth about the gameplay logic.
Then there must be a code that adds to this value somewhere when we pass a checkpoint, just I do not know where! Also it is really hard to put a memory breakpoint on that code because these are all changed downwards for all the cars in every frame so I will stop in every frame with the debugger (8-10x).
Smarter memory breakpoint
It seemed that I would need one another long analysis to find an 'add' operation similar to the way how I have found the substraction - with the good old pen-and-paper analysis and mapping out more of the update function.
Before starting this mechanically however I had a brilliant idea thank God: If I already know that 200 = 1 seconds in the representation, why do not I put a memory breakpoint only on the second 16 bits of the time variables?
This way I get a breakpoint only one time per second AND when we are passing the checkpoint and it updates the whole counter! The checkpoint always gives more than one seconds, while the subtraction affects this only per seconds.
This way I went close to a checpoint gate with maximum speed, paused the game, activated the breakpoint on the second 16 bits of the variables and let the game loose.
I have found what I was searching for and checked it back:
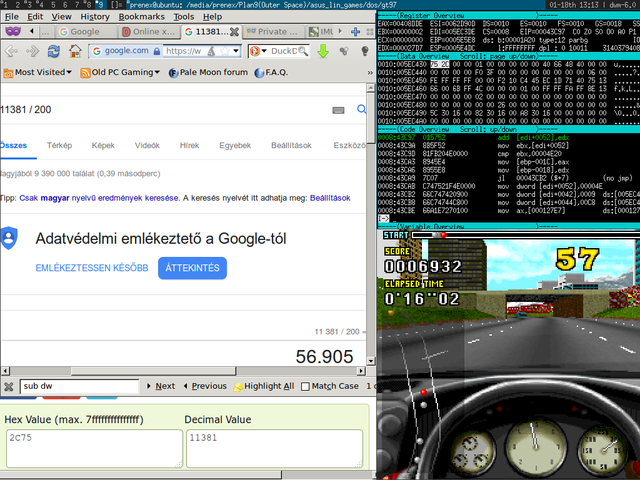
As you can see I have found it is 0x2C75 after the change, which equals to 11381 in decimal. Divided it by 200 (to get seconds) we got 56.9 and we see we are having 57 shown on the timer. Our theory is good!
Fixing the checkpoint times
After knowing the real memory address we need to look for, we quickly also found a code that calculates how much bonus time we will get. This code is also applying to all other cars of course (maybe even non-race cars).
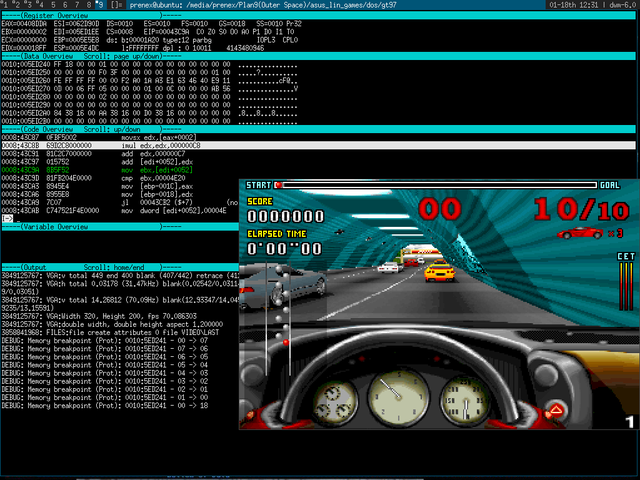
As you can see this is basically a really similar code to what we have seen earlier when te game loads in. It might be this is actually the very same function in a high level language but is 'inlined' by the compiler.
The maths in the 'calculating new timing function' chapter applies here as well so what we had to do is to change this in the debugger while the game is still running in the dosbox window and check the result.
I made a terminal recording about the hacking process:
4th day and finalization
I went to sleep late once again, but even more happy than any other day. The problem seems to be solved and only minor stuff remained to do.
These were:
- Creating hacked binaries with HIEW32 (hackers view)
- Testing the resulting game - functionally and for gameplay quality
- Minor adjustments
- Writing the blog post, gathering pictures, uploading to server etc.
Creating the binary was fast:
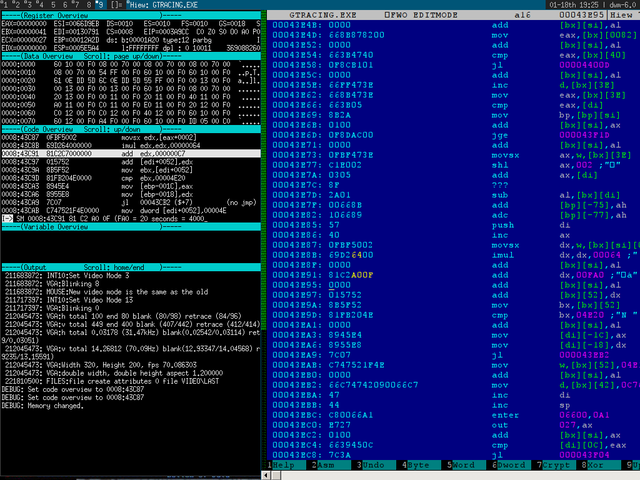
Adjustments and testing
Playing with the game however became too easy for my feeling so I adjusted the values to became a bit harder. I still half all the bonus times encoded in the track data files, but instead of giving it +20 extra seconds to them constantly I only give +18. This resulted in a much more tight gameplay, that I find still beatable. I provided both this and the original hack that corresponds more closely what you can see on the youtube video.
Writing the post and gathering all the stuff also resulted in a lot of time being gone from my life, but I thought it is fun to share my journey.
Possibilities to enchance my work
As you know: because of parts of the game code that can be minified, there is actually a possibility to add really complex extra game logic so in case anyone else wants to play with the game in the hackers way, they still have a lot of nice things to discover on their own.
With the memory breakpoint possibility we can also find the code that is processing the track data files if you follow my debugging up to that point. This might be of interests for those who want to find how the files store the track data and want to build a map editor or something. I think it is possible if you are willing to give in a similar amount - or more - work!
Useful links
Awsome cyber-security page with only assembler / disassembler
For those who cannot count hexadecimal in their head
and last but not least:
How it started: my blog post of removing CD check in GT97 racing
Downloads
Download the hacked GTRACING.EXE executables:
Contents:
    nocd_only: only removes copy protection
    nocd_checkfix: checkpoint time fixes - contains easy and norm
    nocd_notimer: timer never goes downwards
    nocd_fullhackz: everything + no collision with cars
Just choose the version to your liking and copy the exe over the original! I advise to try the 'nocd checkfix' version without choosing the 'easier' executables first. That seems to be the closest to what the game designers originally meant the game to be played like.
Prenex
PS.: I think I had to go through this deephackz because I posed with a hackerman picture earlier. Now I can hopefully deserve it more even though it must be God that helped me not get stuck in the bunch of machine code...

Tags: retro, gaming, dosbox, crack, gtracing, hacking, assembly, debug, hack, linux, cdemu, make-it-work, gt, 97, racing, trainer, fix, patch, bugfix, checkpoint, time, issues, too, little, bonus, no, cd, no-cd, problem, cannot, beat, pwn, h4x00r, hackerman

